A Tour of Spoofax/IMP
Spoofax
This page provides a tour of the different features of Spoofax. For additional supporting material and documentation, visit our
Documentation page. For a quick overview of features, see the
Features page.
|
Tip: We provide general Spoofax usage tips using boxes like this one throughout this tour.
|
Installation
Moved to
http://metaborg.org/wiki/spoofax/download
Getting Started
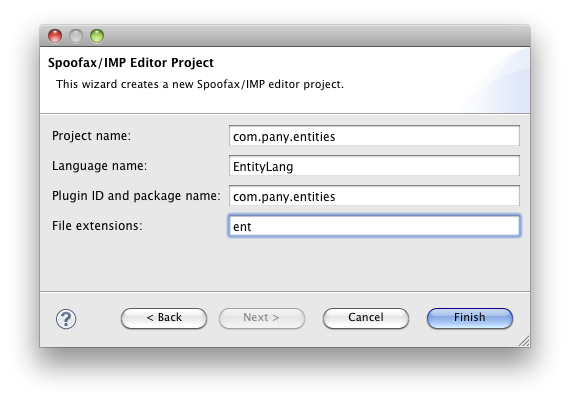
To get started, create a new Spoofax/IMP project using the
File > New > Project > Spoofax/IMP project wizard.
The wizard creates a new an example language and editor definition. It also opens editors for the crucial parts of these definitions, as illustrated below:
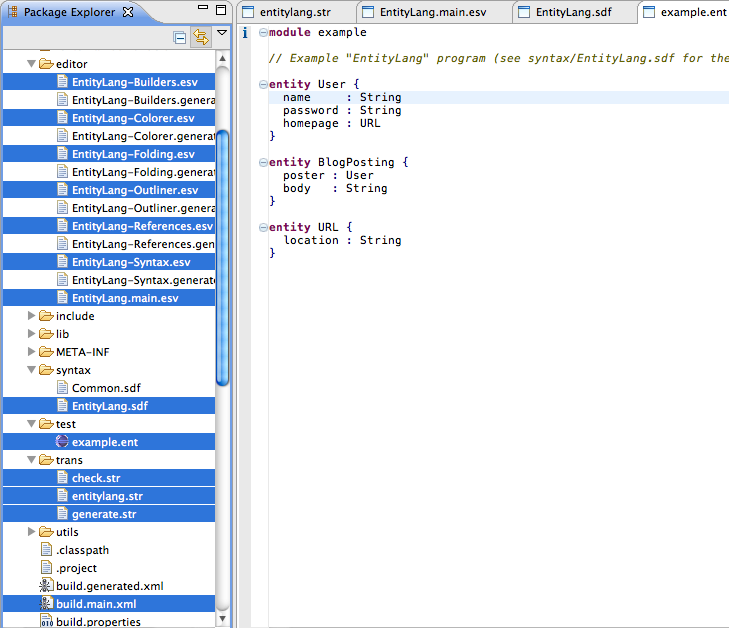
Highlighted in blue are components that can be used to customize the language and editor. Key components (show in tabs, from left to right) are the
SDF syntax of the language, the
main editor descriptor, and the
Stratego semantic description. The wizard also opens an editor with an example file that can be used to try out the language editor.
We recommend you glance the files in the project to get an idea of what function they have. The wizard filled in some default content that can be edited. Other files are
derived files: in particular, all files with
.generated in their name are derived from the language definition. These files should not be edited directly as they are generated every time the project is built.
|
Tip: To rebuild the language and editor at any point use Project > Build Project (control-alt-B) or right-click on the build.main.xml file and run it using Ant.
|
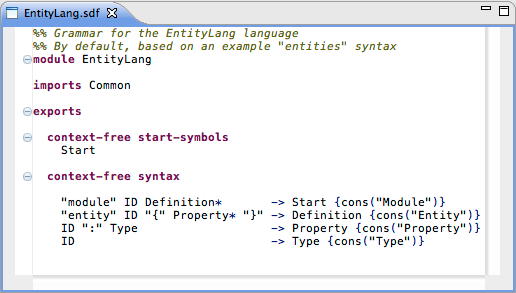
The syntax definition
The SDF grammar in the
syntax directory defines the syntactic structure of the language:
The easiest way to work with the syntax may be to look at it side-by-side with an example editor, allowing you to experiment with the grammar and a concrete file.
|
Tip: To show two editors side-by-side in Eclipse, drag their caption to a position adjacent to another editor.
|
The syntax of the default entities language has four production rules: a
start production with the
module keyword, and productions for entities, properties, and types. SDF productions take the following format:
p* -> S {a*}
And specify that a pattern
p* reduces to a symbol
S (sometimes called a sort). Using annotations
a*, the abstract syntax and exact behavior of the production may be customized. In particular, we use the
cons("Name") to specify that "Name" should be used to label the abstract syntax tree node. The abstract syntax is relevant for code generation and analysis of the language. We revisit this topic further on in this section.
To best get a feel of the SDF grammar formalism, try adding a new production to the language. For example, add a new kind of entity property that has a different (composite) relation to its type:
ID "<>" Type -> Property {cons("CompositeProperty")}
Note how SDF just allows you to add an additional case to the
Property symbol. SDF can be used to modularly reuse and extend existing grammars in this fashion. The constructor label "CompositeProperty" is used to uniquely identify this new property relation. To try it out, rebuild your project (using control-alt-B), and use it in the example editor.
|
Tip: For more information on using the SDF, see the reference manual on the Documentation page.
|
The abstract syntax
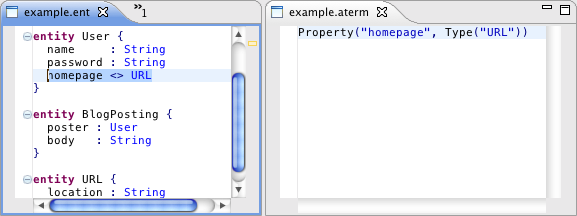
Spoofax can show the abstract syntax of your program as textual terms. These are efficiently stored in memory and allow you to concisely manipulate programs. To inspect the abstract syntax of a file, select
Show abstract syntax from the
Transform menu:
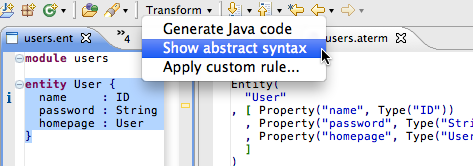
An extra editor will be opened to the side showing the abstract syntax of your file or selection. Note that the view is updated as the original file is edited.
Presentational editor services
Presentational editor services such as code folding, the outline view, and syntax highlighting are defined using
esv files in the
editor directory.
Code folding
As an example, we take a look at the definition for code folding:
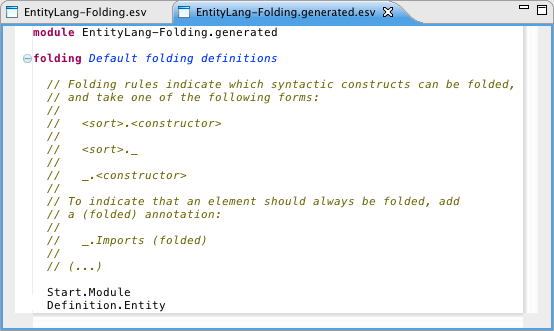
The default
EntityLang-Folding.generated.esv file defines folding for the start production (symbol Start, constructor label Module) and for entity definitions.
All editor services follow the same basic structure: they have a definition file (
EntityLang-Folding.esv) and a derived file (
EntityLang-Folding.generated.esv). The first file can be used to customize the editor. The second file is automatically generated from your grammar, each time the project is built.
|
Tip: The .generated files document the editor descriptor languages using comments.
|
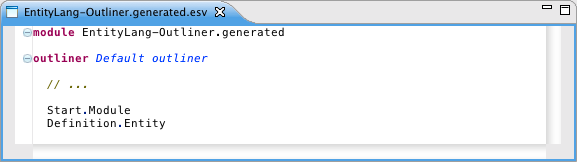
Outline view
The outline view of the editor can be customized in the same way as the folding definition:
An interesting feature of the outline is that it can be shown in the
quick outline view by pressing control-O (command-O on Mac OSX). This allows users to quickly navigate in the file:
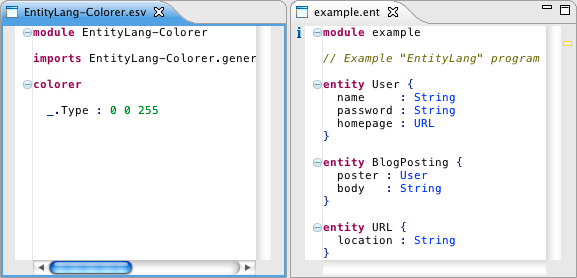
Syntax highlighting
We can use the
EntityLang-Colorer file to customize the generated syntax highlighter:
Transformations and code generation
The
generate.str file in the
trans directory defines code generation rules:
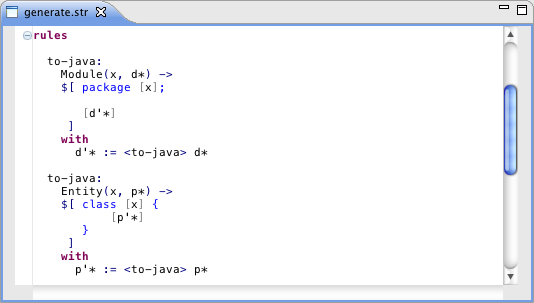
These generate Java code directly from the
abstract syntax of the language. Each takes the following form:
name:
  T1 -> T2
  with
    x := y;
    ...
A rule of this form rewrites a subtree of form
T1 to
T2. In the optional
with clause of the rule, variables can be assigned and other rules can be invoked. Some rules specify a
where clause with a condition for the rewrite rule.
The rules in our example directly rewrite to Java code using
string interpolation to construct Java as text fragments. String interpolation allows you to combine text with variables. Any indentation you use is preserved in the end result, minus the indentation leading up to the quotation. This means your code looks pretty both when you write it and when it comes out of the generator. You can use string interpolation using the
$[ ... ] brackets. Variables can be inserted using brackets without a dollar:
[ ... ]. If you want, you can also use any other kind of bracket:
{,
<, and
( are allowed.
You can try out the transformation using the
Transform menu, selecting
Generate Java code:
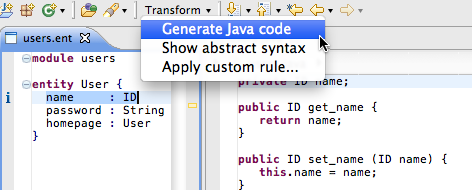
If you edit the input text, the transformation result will be automatically updated. Try changing the transformation and rebuilding the project.
Advanced transformations
When you implement more complicated transformations you will find that it is easier to use intermediate rewrite rules instead that rewrite entity ASTs to simpler entity ASTs (sometimes called model transformations or desugarings). To accomplish this, you can add additional definitions for the
to-java rule, or you can add a new rule with a different name:

This rule rewrites the
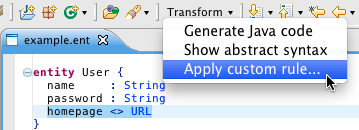
CompositeProperty we have shown before to a regular property. We can now rebuild the project and try out the transformation. Select a composite entity property in the editor or abstract syntax view and choose
Apply custom rule in the
Transform menu:
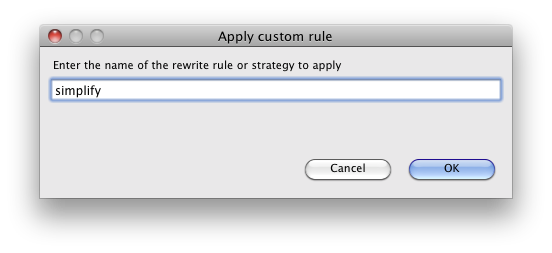
When prompted, enter the name of the
simplify rule:
The result of our transformation is now shown in an a view to the side:
To use the simplify rule in our transformation to Java, we must make sure that it is invoked there. The original
to-java rule was invoked in
entitylang.str, which defines the main interface of our language for the editor:
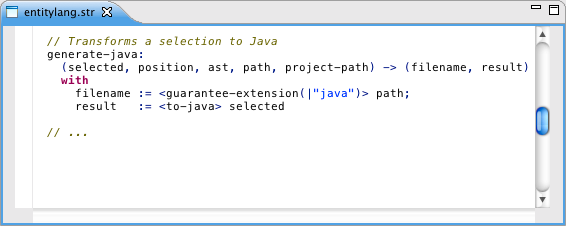
This rule follows a fixed interface for interoperability with the editor, and gets the node currently
selected by the user, its tree
position as a list of indices, the complete
ast of the file, and the path of the file. As a result, it returns a tuple of a filename that should be generated and its contents.
We can adapt the
generate-java rule to call our new
simplify rule:
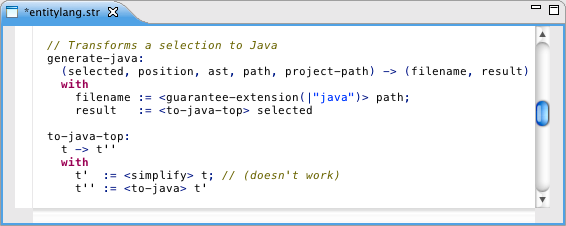
We added a new rule
to-java-top that first invokes the
simplify rule before
to-java is invoked. However, when you rebuild the project you will find that this adaptation does not work: the
simplify rule cannot be applied to an entire module. Unlike
to-java, it is only defined for
CompositeProperty.
We can fix our transformation by introducing new definitions for the
simplify rule for modules, entities, etc:

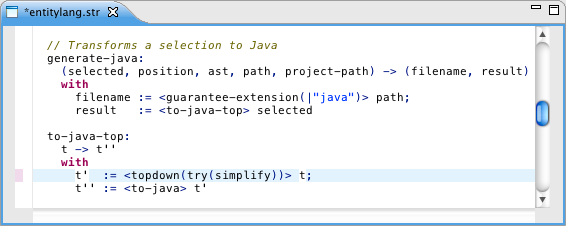
Unfortunately, this practice quickly becomes tedious and hard to maintain. Stratego also allows us to specify a
strategy according to which the rule should be applied in the entire tree. A common strategy is the
topdown/try strategy: walk the tree in a
topdown fashion, and
try to apply it everywhere in the tree where possible:
Other useful strategies are
map, to apply a rule on a list (e.g.,
map(simplify)), and
innermost, to exhaustively apply a rule, starting at the innermost leaves of a tree.
|
Tip: For more information on using strategies and rewrite rules in Stratego, see the reference manual and tutorial on the Documentation page.
|
Customizing the Transform menu
The Transform menu allows you to apply any rule to a file or selection:
Transform can be used directly in an editor of your language, but also from the abstract syntax of that language.
The
EntityLang-Builders.esv file in the
editor directory defines the entries in the Transform menu:
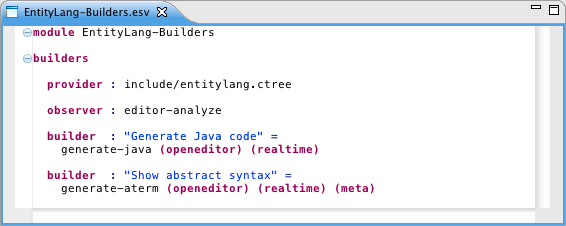
The corresponding
EntityLang-Builders.generated.esv documents the definitions in this file. For this tour, we are interested in the
builder definitions, which control the Transform menu items. The first
builder specifies the "Generate Java code" item. It indicates that the
generate-java rule that we saw before is responsible for this action. Using annotations, it also specifies that this action
opens an editor which will be updated in
"real time" as the user edits the source of the tranformation. The second
builder is a
meta builder: it only shows up to developers of the language, not when the plugin is deployed.
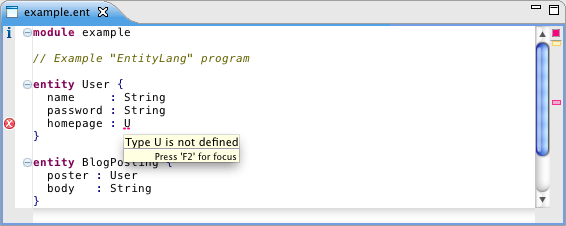
Error checking
Any errors in the entities language are reported directly in the editor:
These errors are specified using check rules in the
check.str file in the
trans directory:
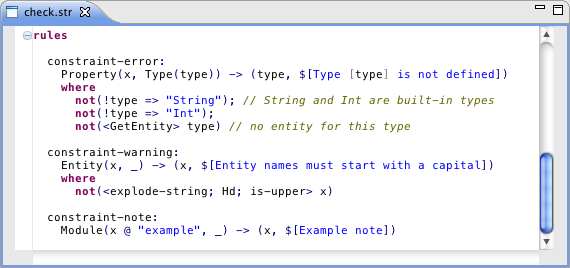
Like code generation rules, these rules are really just regular rewrite rules. They match against a particular language element and produce a tuple of the offending language element (where the error marker will be shown) and the error message.
The first definition of
constraint-error matches properties where a particular condition holds (note the use of the
where keyword): the property type is not "String" or "Int", and using
GetEntity (defined below) we can tell that it does not exist in the symbol table.
Refactorings
Spoofax helps you to enrich your editor with refactorings. You can find the refactorings in the context menu of the file being edited.
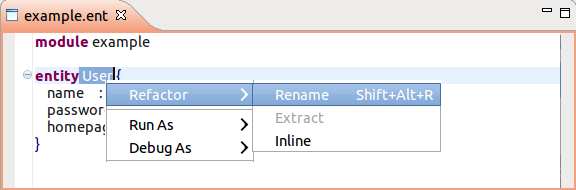
Refactoring Specifications
The
EntityLang-Builders.esv file in the
editor directory defines the entries in the Refactor menu:
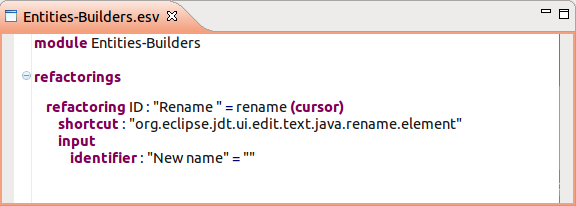
The given
refactoring specifies the "Rename" menu item, which is enabled in case an ID node is selected.The menu action is bind to the rename shortcut (Shift+Alt+R). After the user applies the rename refactoring, a dialog is prompted with an input field labeled "New name" that has the empty string as initial value.
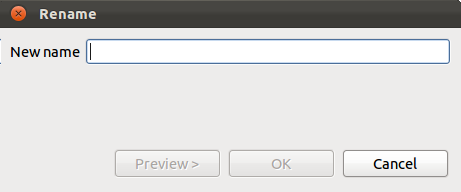
The OK button of the dialog triggers the action defined with the
rename rule that we discuss in the next paragraph.
Refactoring Transformations
Refactorings are defined in Stratego. The
refactor.str file in the
trans directory defines the renaming refactoring for the entity language.
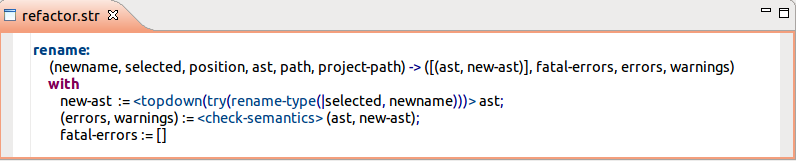
This rule follows a fixed interface for interoperability with the editor. The left-hand-side of the rule is a tuple of: the result of the user input dialog, the selected node, its tree position, the complete ast of the file, the file path and the project path. The right-hand-side is a tuple containing the refactoring output: a list of node changes, plus lists with errors and warnings that will be reported to the user. Errors and warnings are specified as a tuple of the offending language element (which location will be reported) and the error message itself.

|
Tip: multiple-file refactorings can be specified in the change list using the root nodes: [(ast-1-before, ast-1-after), (ast-2-before, ast-2-after), ...]
|
Program analysis
We use a symbol table as the basis for our semantic analysis. Every entity is stored in this table, mapping its name to its definition. This table is defined in the
record-entity rule in
check.str:
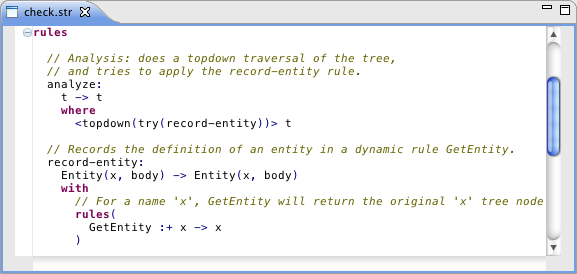
The
analyze rule uses the
topdown/try strategy we have shown before. It will try to apply the
record-entity rule wherever it can. The
record-entity rule is applied to all entities: User, BlogPosting, and URL. Stratego provides a concise notation for creating symbol tables: using the
rules keyword, we define a new entry for the name 'x' that points to the node in the abstract syntax tree that defines it. We use this definition for error checking, reference resolving, and content completion.
Reference resolving
When a user holds control (or command on Mac OSX) and hovers over an identifier, they get a link to its definition:
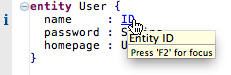
Supporting reference resolving is easy once a
program analysis is performed. By default, the entities language simply invokes the
GetEntity rule to fetch the definition for any
Type selected by the user:
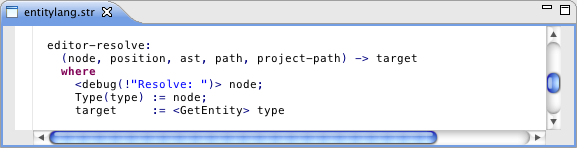
This rule follows the same structure as other rules in this file. It first prints a debugging message "Resolve: ...", which shows up in the Eclipse console (but not when the plugin is deployed). It then tries to set a variable
type using the
node that was just selected by the user. If the node is of the form
Type(_), then it will call the
GetEntity rule to resolve the declaration of that type. Since
editor-resolve uses a
where clause, it will only succeed if
node is in fact a
Type and if
GetEntity succeeds. If this is not the case, another definition may of
editor-resolve may be used instead, if one exists.
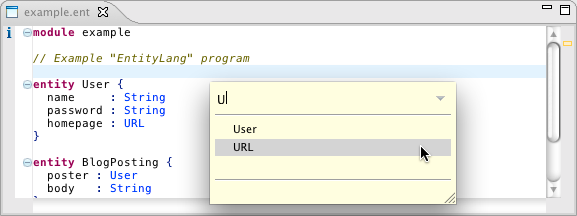
Content completion
Spoofax supports content completion that can be triggered by pressing control-space:

Content completion can also be triggered when the user enters a particular sequence of characters (like the
. in Java). The
EntitityLang-Completions.esv allows this behavior to be configured:
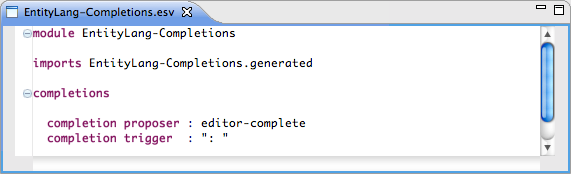
This file specifies that content completion should be triggered once users enter ": ". It also says that the
editor-complete rule handles the implementation of content completion.
Like other editor services in Spoofax, content completion is implemented at the abstract syntax level. Once content completion is triggered, an AST like the following is created:
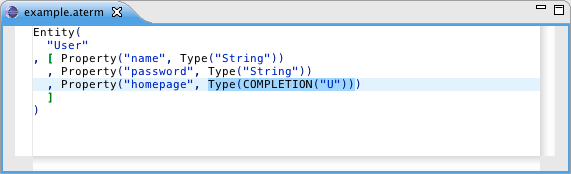
In this AST we see a special
COMPLETION(_) note where content completion is requested. The
editor-complete rule in
entity-lang.str provides completion proposals:
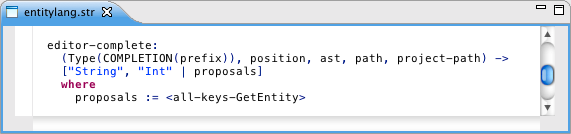
This rule gets the current abstract syntax tree node, its position, etc. and returns a list of content proposals. The "String" and "Int" proposal are hardcoded; other proposals are computed by taking all the keys of our
GetEntity table. For this we use the
all-keys-GetEntity rule which is automatically made available from our
GetEntity definition. Spoofax will then automatically show proposals with the right prefix (here the letter "U").
Testing Language Definitions
Spoofax allows you to write tests for your language implementation using a specialized testing language. An example set of tests can be found in
test/test-example.spt.
A basic testing module has the following form, specifying the name of a language:
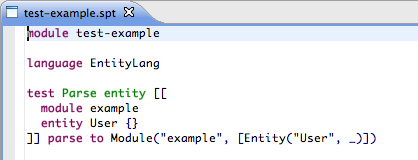
It specifies the name of the language under test (
EntityLang) and one or more test cases. The test case in this module is based on a small EntityLang program enclosed in
=
?= brackets, and specifies that this program should parse to a pattern
Module("example", [Entity("User", _)]).
More advanced test cases may use
setup blocks to factor out commonalities in test cases, and can specify a wide range of testing conditions:
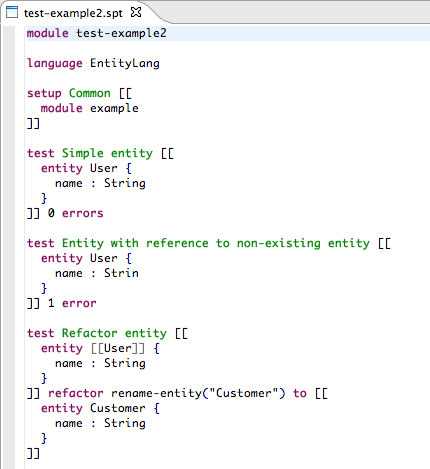
These test cases test for semantic errors (
0 errors or
1 error) and test that refactoring works as expected. Notice how the last test case uses the
=
?= brackets to indicate that a rename refactoring is performed on the "User" entity. This test case simulates the renaming of the "User" entity to a "Customer" entity.
Any failing test cases are marked with an error in the editor. The "Transform" menu can also be used to launch a project-wide, graphical test runner:

Plugin deployment
You can deploy your plugin using the Eclipse update site mechanism. Users do not need to have Spoofax/IMP installed for using your plugin. To create an update site, you need to create a
plugin feature project and an
update site project.
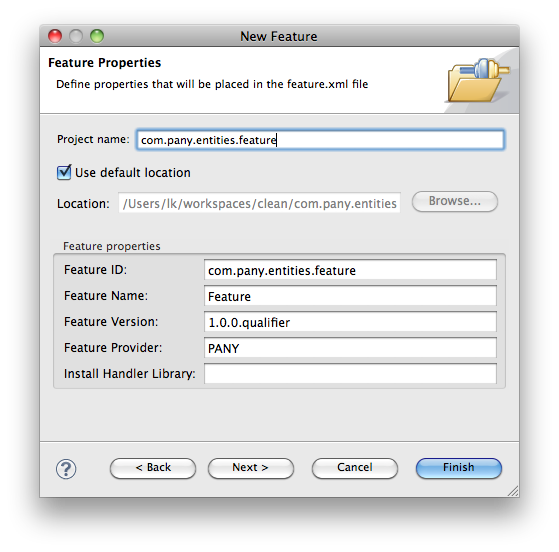
You can create a new plugin feature project by using the
File > New > Project > Plug-in development > Feature Project wizard:
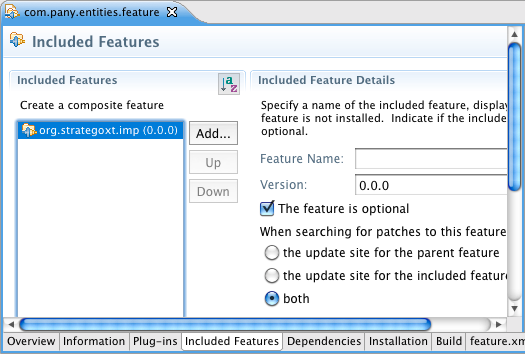
In the tab plugins, add your plugin to the list of included features using the "Add" button.
In the tab
Included Features you should add Spoofax/IMP. Be sure you select that it can be updated from "both" update sites for maximal compatibility with existing installations and updates:
You can then create an update site project. From
Overview page of feature.xml, open the
New Update Site wizard:

As the name of the update site you may use
company.entities.updatesite. In the update site project, create a new category and add the feature project:
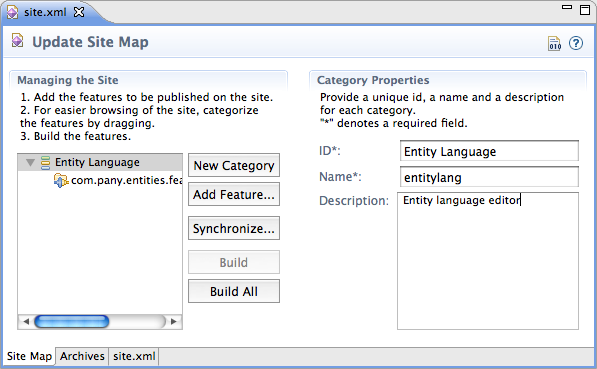
From here, you can select
Build All to build the update site. You can then upload it to a web server and use it to install or update your plugin using the Eclipse update manager.
Adding Java components
Some advanced users may want to add their own Java components to their plugins. Spoofax provides two mechanisms for interoperation with Java and other JVM-based languages. The first mechanism is the standard Eclipse extension mechanism: as the Spoofax framework is based on Java and Eclipse, it allows you to add new, Java-based components as
Eclipse extensions. The other mechanism is that it allows users to implement their own strategies (functions that follow the Stratego interface) using Java. This mechanism is documented in the
editor/java/.../strategies/java_strategy_0_0.java example strategy included with the default project. Strategies implemented this way can be dynamically loaded just like other Spoofax components.
In this tour we focus on the Eclipse extension mechanism. These components can be added using the Extensions tab of
plugin.xml:
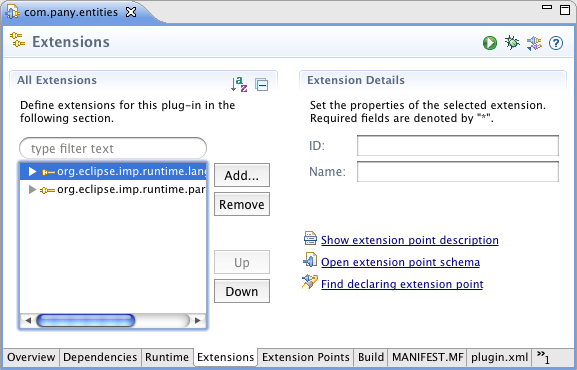
You can then select Add to add a new extension:
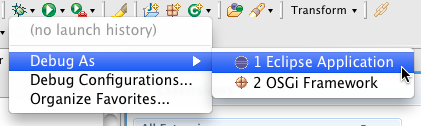
Note that only editor components defined using Spoofax/IMP can be used directly in the same Eclipse instance in which they are developed. Normal Eclipse plugins and extensions do not have this
feature. You can try your Java-based extensions using the debug or run buttons in the tool bar, launching a new Eclipse instance:
A key class for integrating with Spoofax editors from Java
org.strategoxt.imp.runtime.EditorState class, which provides things like the current or selection AST of an open editor. It also allows model listeners to be attached using
EditorState.getEditor().addModelListener(). Please
contact us if you have any questions about Java integration or other topics; we'd be happy to help.
All built-in Spoofax/IMP editor components are based on the
Eclipse IMP framework. In addition to standard Eclipse plugin extensions,
IMP can also be used to define parts of your editor. These can be created using the
File > New wizard, selecting any of the IDE Language Support options. At this time, however, not all these wizards are stable, and they may not always work right within the Spoofax/IMP environment. Instead, we recommend that users build editor services using the Spoofax-native
esv definitions or, if necessary, using regular Eclipse extension points.